Showing posts with label Christmas Cards 2011. Show all posts

Wednesday, 13 July 2011

Christmas Meeces

Good Afternoon Everyone, 

A quick card for you to have a look at today, this has been made for a few challenges and is themed around Christmas. I have used the House Mouse Cocoa stamp range from Joanna Sheen Ltd. 

I have made the card using a white a4 landscape card, which has been backed using two designer papers which one has been matted onto dark blue card, the image has been stamped using Momento ink pad and coloured in using Promarker pens. The stamped image has then been matted onto the dark blue card as well. The snow has been highlighted using a white gel pen. The card was finished with a dark blue ribbon and bow, blue buttons and silver snowflakes, the swirl background paper was also highlighted using a clear glitter glue pen. 

The Card

Side View
 

The Image

The Ingredients 
White Card
ProMarker Pens - 
Mice=Blush, Sandstone, Caramel, Cocoa, Pastel Pink = Mice.
Sky= China Blue
Lantern = Cool Grey 1 & 4
Blanket = Forest Green and Buttercup
Candle = Poppy
Flame= Buttercup and Tulip Yellow
Blender Pen 
Dark Blue card stock
Blue snow flake background - House Mouse CD Rom
Blue Swirl Background - Crafters Companion. 
Blue Buttons 
Blue Ribbon
Blue Bow.


The Challenges

Thank you for taking the time to look and any comments I would greatly appreciate
Hugs for now
Kelly
xxx

Wednesday, 8 June 2011

Bah Humbug Challenge- Surprise Surprise

Good Afternoon Everyone, 

Well here is a card I have just made for two challenges one challenge is the Bah Humbug Challenge Surprise Surprise, this challenge leads us into created anything we like providing it is on a Christmas Theme, the second is from a Do Craft Demonstrator Gill who asked us to create a card or scrapbook page using the theme black and white.

So the card I made is a Christmas card, the card is a square white card blank with a black matting covered with a white backing paper with black and gray dots and squares on, then onto that I have placed a ribbon down the edge and a tiny piece of ribbon put into a not at the top. On top of this mat and layer I have created a further black and white layer with the white being embossed through the Cuttlebug machine.  The main image is cut from the Cricut machine using the Home Decor cartridge.
The sentiment is a Peel Off that was coloured in using a black pro marker, and to give the card a bit of bling. I have used some gems on the topper to give it the wow factor.

I think the card is simple but elegant and another one to add to my Christmas Collection. 

The Card


The Topper

The Ingredients 
Square card blank
Black card
White card
Embossing folder
Cuttlebug Machine (or one similar )
Gems
Greeting
White Ribbon
Cricut Machine
Cricut Home Decor Cartridge

The Challenges 
Gill - Do Crafts Demonstrator 
Bah Humbug - Surprise Surprise 

Thanks for having a look any comments would be greatly appreciated. 
Hugs
Kelly 
x

Friday, 29 April 2011

Guest Designer Bah Humbug - Ruffles and Pleats

Morning Everyone, 

Well this is the last card I need to make for my guest designer post at Bah Humbug Challenge Blog.
I have really enjoyed my time as a guest designer and do not want it to end. 
This card that I have got for you this week is a card using pleats and ruffles, and my word I had a real hard time with this one. The end card is one of 10 half finished cards that just did not fit the bill and got abandoned half way through. 

The card I have made is a DL size card, with holly backing paper folded into pleats, fixed half way across the DL card and finished of with a gold border peel off over the top of the pleated edge. 
The image is a beautiful Sarah Kay rubber stamp called "winter wonderland" I stamped the image using momento ink pad, and coloured in using promarkers. To give the definition of vintage I edged around the stamp with Tim Holtz Distressed ink.  The topper was put onto red backing paper and then mounted half onto the pleated paper and cream card base. 
To highlight the snow on the topper I used a Sakura jelly roll white pen.
The flower I have created using 18" off ribbon and to create the ruffle of the flower, I have done a runner stitch down one edge of the ribbon, the cotton is then pulled to create a ruffle, I then manipulated the ribbon into a circle and sealed it with a pearl brad. 
The card is then finished off with a Christmas sentiment and three red gems. 

The Card


The Ribbon Flower


The Pleats


The Topper


The Ingredients 
  • Cream Card Blank
  • Holly Paper - Joanna Sheen Vintage Christmas 
  • Black Momento ink pad
  • Pro marker pens - Caramel, Blush, Ruby, Henna, Sandstone, China Blue, Forest Green.
  • Sakura- Red Glitter gel pen, White Jelly roll pen 
  • Red card stock
  • Tim Holtz distress ink 
  • Gold Peel off
  • Red Ribbon
  • Pearl Brad
  • Red Gems
  • Christmas Sentiment

Challenges

Well that's the card for today.
Thank you for stopping and having a look

Hugs
Kelly x

Friday, 22 April 2011

Guest Designer Bah Humbug - Challenge - Santa

Morning Everyone, 

Well I have using the new software for blogger and at the moment I am liking, I also have sorted out auto upload (i hope) so fingers crossed this works. 

So for this week's challenge it is all about Santa, now I can tell you I had a bit of trouble with this one (but not nearly as much as the one for next week, but you'll have to wait till next Friday to find out more about that) I normally do Santa as a character i.e. popcorn, messy, but this time I was thinking off doing more off a traditional one, now it might have just been me but crikey I couldn't get my head around it, so after throwing a paddy I went back to my trusted characters, and pulled out the Joanna Sheen Messy Rabbit Christmas Collection, and found the Rat dressed as Santa trying to deliver the presents. So I went with this but changed the colour scheme to a colour I would not normally use for Christmas, but I think it works quiet well.

First off all I found the topper I wanted printed the topper out four times so that I could decoupage it up, then using the same CD printed of the two corresponding backing papers, I decided I wanted to make an easel card and went for a 6x6 square for a change (now just need to buy envelopes) One of the backing papers is a dark blue with presents on, I decided to work with the blue on the backing paper and this is how the card developed, I backed the blue backing paper onto white card, using a square of dark blue card I matted the white hat backing paper onto the blue card and mounted this onto the dark blue backing paper. I then mounted the decoupaged image onto white card, which was then mounted onto a chalked blue piece of card to give me 7 layers on the top (this will not be posted out, I think I would need a loan to post it with the postage prices today) For the easel part of the card I did exactly the same matting as the main image and mounted a Happy Christmas Banner greeting onto it. To finish off the card I put a dark blue satin bow on, three snowflakes that I promarkered, to get the colour to and three blue gems at the bottom of the topper section. On the topper itself I coloured in the presents with Sakura gel pens to give a bit of bling, The snow on the chimney, is created using "fake snow" that I got from a model train shop. The fluffy part of the coat, hat and trousers is created using a product called "fluffy stuff" however I didn't let it fully fluff up. 

So lets have a look at the card. 

The Card


The side view of the card


The Ingredients 
  • White Card Base
  • Blue Card
  • Messy Rabbit Christmas Collection CD Rom by Joanna Sheen 
  • Blue Ribbon
  • Blue Gems
  • Blue Pro marker (Royal Blue)
  • Three Silver Snowflakes
  • Happy Christmas Banner Greeting 
  • Fluffy Stuff
  • Fake Snow
  • Sakura Glitter Pens
That's all for this post. 
I hope you like and I would love any comments on the card good or bad. 

Thanks for popping along to have a look

Hugs
Kelly xx

Friday, 15 April 2011

Guest Designer Bah Humbug Challenge - Stockings

Wow has another week really gone past.

This card is for the Bah Humbug Challenge Blog, of which I am lucky enough to be a guest designer.

This week’s challenge was to create something using Christmas Stockings as the theme, and Boy did I have to think long and hard about it.

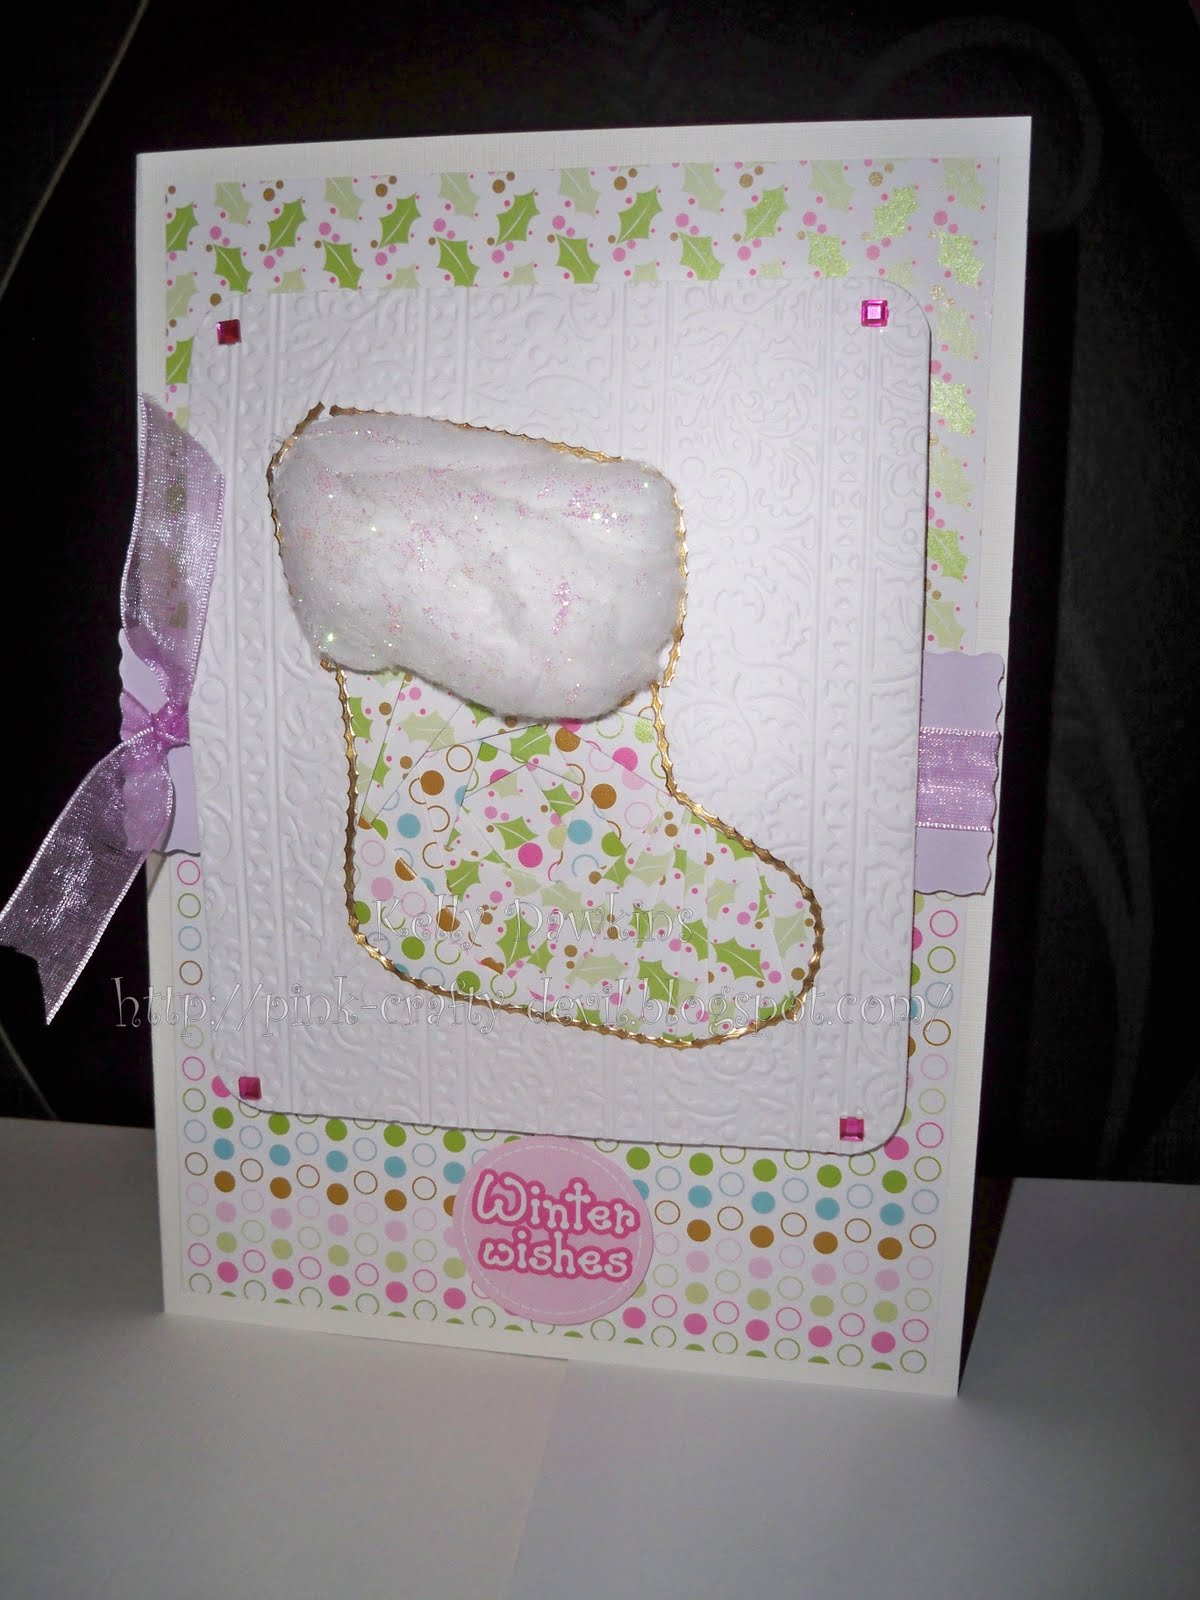
I come up with the following, I started by thinking about what techniques have I learnt but don’t very often use, and one of the techniques was Iris folding…. Now I will admit, I love doing Iris folding as I find it peaceful but it does take me a while to get used to the card once it is made up, this card took me nearly three full days to actually like it.

To create the card I used a free template from Circle of Crafters, of a Christmas stocking, now to try and make it slightly different I went for more contemporary colours for the card, and fell in love with the papers I used. The actual card base is a plain white A4 card folded in half to create a A5 card base. The papers were added to the base, along with a strip of purple card that was cut using a rough scalloped cutter on my guillotine. Purple organza ribbon was added to the card and a bow was tied at the end. The topper is as said a Irish folded Christmas Stocking, before I started the Irish folding aspect of the card, I ran the topper through my Cuttlebug and used a Holly Cuttlebug embossing folder. The edge of the stocking was bordered using a gold peel off and the top of the stocking was created using cotton wool that was stuck down, and then using stickles glue and my finger I glittered the cotton wool up to create a dimension to the stocking (and Christmas stockings always seem to have fluffy tops) the card has a simple greeting of “Winter Wishes” and finally to finish the card I have added four pink gems one to each corner of the stocking topper, to give it that extra bit of bling.

The Card

The Stocking

The Wool and Stocking

The Challenges

This card is entered into the Bah Humbug Challenge Blog – however this is as a guest designer.

The Ingredients

A4 White Card Stock

Baking papers – Pinks/Greens/Blue/ Browns

Cuttlebug Embossing Machine

Holly Embossing Folder

Gold Peel Offs

Cotton Wool

Stickles

Organza Ribbon

Four Pink Gems

Well that is the card, hope the information helps you to recreate the card, and please feel free to leave me any comments good or bad, I won’t be offended.

Hugs for now

Kelly x

Friday, 8 April 2011

Guest Designer Bah Humbug Challenge Candy Cane

Morning Everyone,

I have been working hard on my card for my Bah Humbug Challenge where I am a guest designer for the month of April.
This weeks challenge was to make something with candy canes. I just could not resist this little stamp, such a cutie pie, and holding his candy cane as tight as he can.
The card is made using Green card base, the backing paper is pr
inted from Joanna Sheen House Mouse Inserts CD Rom, as is the insert that I have custom made with my own verse. The image is also from Joanna Sheen and is from her range of House Mouse unmounted Christmas range. Which have being coloured in using Promarkers. The borders at the top and bottom of the page are from my new Cricut cartridge from Martha Stewart which is just adorable. The flowers again at the top and bottom are cut from my Cricut and I have hand made them into roses, the leaves to are from the machine and the swirls are made from funky foam, that I have twisted around a pencil, and heated up slightly to create a tight curl that stays put. The "Merry Christmas" is from stock that I am using up, but again I believe it was cut from the Cricut machine.

Front off the card


Close up of the topper.

The Flowers

The Inside


The Verse


The Ingredients used to create the card.
Card Base-Green Hammered Base Card
Backing paper and Insert - Joanna Sheen House Mouse Insert CD Rom (Please note the wording is not included on the cd)
Topper - House Mouse unmounted rubber stamp from Joanna Sheen
Cricut - Create Machine
Cricut Cartridges - Martha Stewart Elegant Cake Cartridge, All Mixed Up (flowers), Wild Card (leaves)
Ink - Black Memento ink pad
Swirls - Green funky foam
Flowers - Pearls for the center
Promarker's used. Meadow Green, Forest Green, Poppy, Caramel, Sandstone, Pastel Pink, Ginger, Blush, Cool Grey 1


Thank You
Thank you all for taking the time to have a look at my blog and I hope I have giving you all the information you need to re-create this card.
I look forward to reading any comments you have on this card and on any others.
Well for now I will wish you all a good day
Speak Soon
Hugs
Kelly xx

Friday, 1 April 2011

Guest Designer Bah Humbug Challenge -Humourous Card with Tartan


Hello Everyone, Well I have sent in my first guest designer card to the Bah Humbug Challenge Blog.. This week I was asked to create a Humorous Card with Tartan. To complete, this task, I used a image I had off a group off dancing snowpeople, decoupaged a few off the snowpeople, and then mounted this on to tartan and white card. The card base is white card covered in tartan paper, and created into a easel card. To complete the card I put a funny sentiment off One Eggnog, Two Eggnog, Three Eggnog, Floor... To finish the card off I used Christmas confetti and scattered pieces over the card. Hope you like and any comments would be greatly appreciated. Hugs for now Kelly

Thursday, 10 February 2011

Bah Humbug Challenge Card- Buttons and Ribbons


Hello Everyone,

This is my second challenge card I have done for the http://bah-humbug-christmas.blogspot.com this week was to make a card using ribbon and buttons. So for my card I have used a contemporary backing paper off snowflakes in the colours of brown, green, blue, and pink. I matted this onto the white card base. I then used the Octagon Nesstabilities the largest one of the set run this through my cuttlebug and then embossed it using the largest embossing folder cuttlebug do, and this one was called holly and ribbon, I then used pastel chalks and chalked baby pink over it. I stamped and embossed my image coloured it in using pro markers and used glitter glue to add the dots to the party hats. I attached this to the embossed shape using foam pads. The ribbon is tied into a pretty bow at one end, the ribbon I used is a shear lilac ribbon. I then cut out two sentiments one saying "It's Party Time" the other saying "White Christmas" I mounted the "White Christmas" saying onto white card, and fake stitched using lilac glitter glue. I put this onto the card using foam pads. The saying "Its Party Time" is stick flat onto the card. I have them embellished the card using two lilac buttons and one pink button and attached these to the bottom of the card. I also stuck five silver snowflakes around the image to give extra glam.
Hope you like and as always any comments are greatly appreciated good or bad.
I will be back soon, with Valentines Cards
Hugs
Kelly xx

Wednesday, 2 February 2011

Bah Humbug Challenge Card


Hello Everyone,

I have created this card for the Bah Humbug Challenge, Something Old and Something Gold. The card the I have created is a fancy style fold, it fits perfectly into a C5 envelope, and only takes one sheet of card to create. I will try and put instructions up on how to make it later on ...
For the topper I decided to use a stamp I had been giving a few years ago that I had forgotten about, it is a teddy bear stamp holding up a banner saying "Happy Christmas" and around the outside it has written on saying "teddy says it's time to hang up the decorations". I used a gold tinsel embossing powder to create the gold look... To finish the card I went for a vintage come clean look, so I used a cream card and distressed the edges, then embossed a spotty design onto white card and matted this up, the topper was then put on cream card and again mounted to the now matted white spotty card. The side of the card was embellished with gold snowflake peels offs and in the card I have placed two "Merry Christmas" and finally to complete the look I have gone around my white spotty card with gold peel off borders and added a gold bow to the right hand top corner.
I hope you like my card and thanks for looking, any comments are greatly appreciated good or bad.

Until next time
Hugs
Kelly xx